Next.js and WPGraphQL in Headless WordPress
Date
22 APRIL 2024
WordPress is a popular Content Management System (CMS), powering over 43% of the web. To improve the security, performance, and scalability of WordPress applications, developers decouple their WordPress content from their web infrastructure. One of the most popular ways in doing so is by creating a WordPress site with a headless architecture. This post will explain how to use headless WordPress with a frontend framework like Next.js.
What is Headless CMS ?
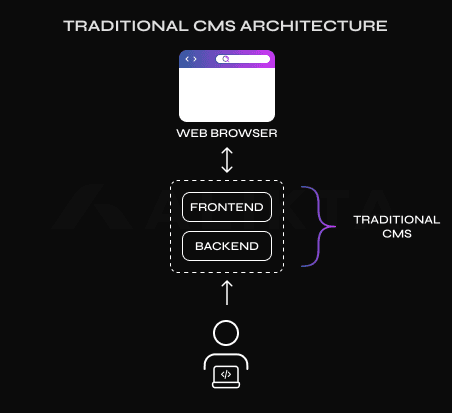
A headless CMS is a Content Management System that uses a decoupled architecture to allow it to act as a backend service accessed via an API or SDK. Traditionally, CMS have acted as both the frontend (presentation layer) and backend (content database) for content editing. With a headless implementation, the CMS only acts in the capacity of content editing and the frontend is served by another solution, in this case Next.js, which fortunately is very well documented, but it’s still easy to run into issues.
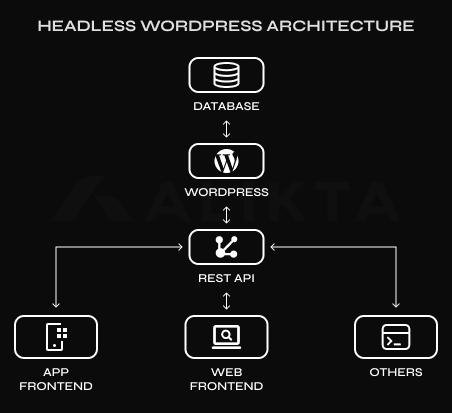
A headless WordPress site is one that uses WordPress for managing content and some other custom frontend stack to actually display that content to a site visitor. While a site built with headless WordPress has many benefits, one of the primary advantages of this approach is decoupling content editing teams and developers.
With Headless WordPress, a marketing team and content team can continue to use their familiar WordPress interface and the development team can use the tools they love like React, GraphQL, in a Git workflow they are comfortable with.
Why Go Headless ?
Decoupling your frontend and CMS-backed content provides many benefits:
- Flexible: You can use Next.js, Gatsby, or any other frontend framework your team prefers and evolve your frontend separately over time.
- Resilient: If your WordPress server has downtime, and you host your fronted on solutions with native support like Vercel or Netlify, your frontend will continue to serve your traffic without interruption, showing the last statically generated content from the cache. Once your WordPress server is back online, you can then start displaying new content, meaning virtually no downtime for the users.
- Easy & Instantaneous Content Updates: In a WordPress dashboard, anyone can keep content up to date. Developers can keep their focus on building applications while others make content changes. Also, with Vercel’s Incremental Static Regeneration, changes are propagated globally really fast, and it can be updated on-demand depending on your frontend host provider.
Using Next.js with Headless WordPress
Setup for this headless configuration is pretty straightforward.
Configure your WordPress site
You’ll need a WordPress server to work with. If you don’t already have one, you can get started locally with a tool like Local.
Install the WPGraphQL plugin
GraphQL is a query language for APIs and a runtime for fulfilling those queries with your existing data. With GraphQL, the client makes declarative queries, asking for the exact data needed, and exactly what was asked for is given in response, nothing more. This allows the client to have control over their application, and allows the GraphQL server to perform more efficiently by only fetching the resources requested.
If you want to know more about GraphQL itself, go here.
To use GraphQL with WordPress, we will use the WPGraphQL plugin.
WPGraphQL is a free, open-source WordPress plugin that provides an extendable GraphQL schema and API for any WordPress site.
In your WordPress dashboard, go to Plugins, click Add New, and then type GraphQL in the plugin search. Find WPGraphQL, click Install Now, and then Activate the plugin.
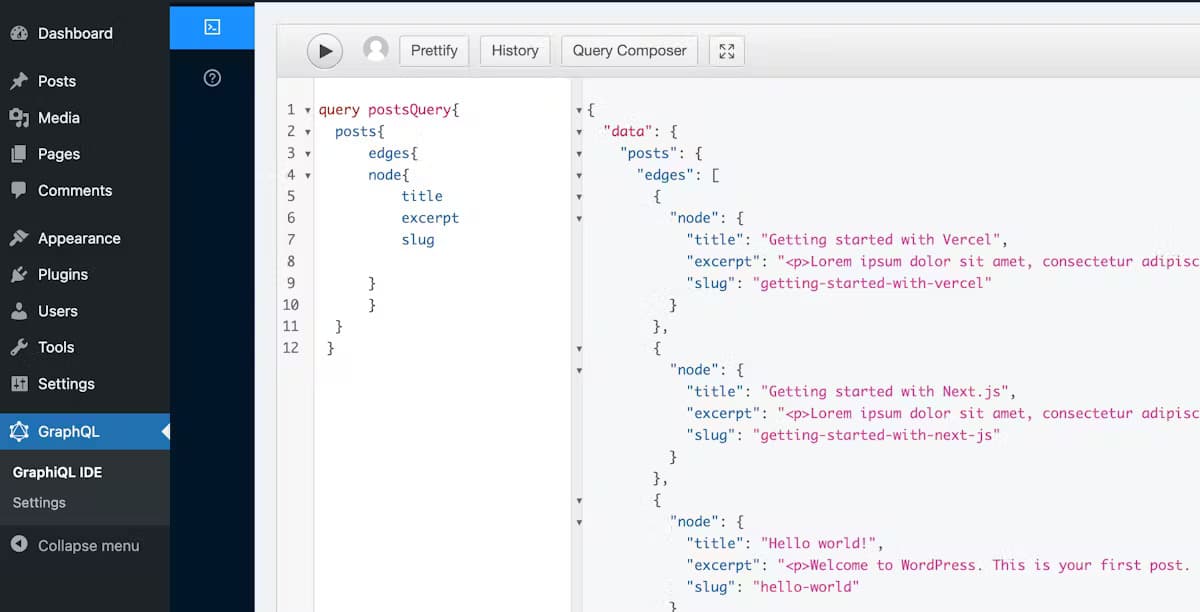
This creates a new section for GraphQL in the side navigation. From here, you can access the GraphQL IDE, where you can write and test your queries and configure the plugin Settings.
Build the frontend with Next.js
For demonstration purposes, we recommend using one Vercel’s examples.
This starter example is built using the default Next.js template with some additional blog features.
To get started, run the command for your package manager:
1
npx create-next-app --example cms-wordpress cms-wordpress-appFetch data from the GraphQL API
In the root directory, copy the .env.local.example to a new .env.local file and set the WORDPRESS_API_URL to your GraphQL API.
1
2
# .env.local
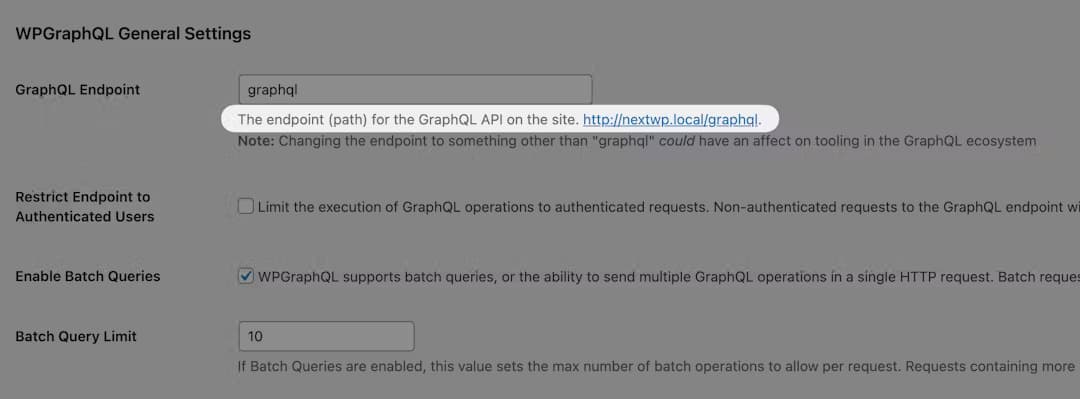
WORDPRESS_API_URL=Find the endpoint in the GraphQL Settings section of the WordPress dashboard. WPGraphQL’s default is /graphql.
Install dependencies and run the Next.js dev server
Next, run npm install to install project dependencies, and npm run dev to start the local server.
You can now view the local version of your app at http://localhost:3000. The blog post content on your home page is sourced from your WordPress backend, if you try updating it in the backend, you should see the changes on the frontend once you refresh the page.
Making your own queries
Now that you are running a dev server, you can start building your site by feeding it the data you want, and nothing else. This will be done by making your own queries for your own blocks and other elements you have.
A GraphQL query looks really simple, something like this:
query Posts {
  posts {
    nodes {
      title
      slug
      content
    }
  }
}
This is a simple query you can use to get some data from your posts, so that you can show it on your frontend.
Posts and most other data in your WordPress can be queried as nodes or edges, depending on your preference, they are called connections, and there are 4 types :
- node: A node is an individual resource. For example, a Post, Page or User.
- nodes: A collection of one or more resources
- edge: The space between connected nodes where contextual data can be accessed.
- edges: A collection of one or more edges
This may be confusing, but no need to worry, all of these can be selected in the UI on the left called Query Composer, so you don’t have to know exactly where everything is while writing queries, you can just click on what you want.
On the right will be the result of your querie. This shows what will be the response from your website once you make the POST request to the GraphQL endpoint of you WordPress site with that query as a body of the request.
Next you would need to decide on the data fetching technique you want to use in Next.js, and data fetching in Next.js allows you to render your content in different ways, depending on your application’s use case.
In short, these include pre-rendering with Server-side Rendering or Static Generation, and updating or creating content at runtime with Incremental Static Regeneration, and they are covered here.